As a Sumoling, I have purchased dozens of SaaS apps from AppSumo. I need a customised homepage to organise my SaaS and self-hosted service.
I have tried a few options on the market, but only Dashy is a perfect fit for me.
It provides not only an intuitive GUI but also a lot of icon options.
Moreover, it supports multiple pages, so I can categorise different services on various pages. This article will teach you how to set up a Dashy dashboard using Docker Compose.
Step 1: Update the package list and install the required packages.
sudo apt-get update
sudo apt-get install \
  ca-certificates \
  curl \
  gnupg \
  lsb-release
Step 2: Import the Docker official GPG Key to your system.
curl -fsSL https://download.docker.com/linux/ubuntu/gpg | sudo gpg --dearmor -o /usr/share/keyrings/docker-archive-keyring.gpg

echo \
 "deb [arch=$(dpkg --print-architecture) signed-by=/usr/share/keyrings/docker-archive-keyring.gpg] https://download.docker.com/linux/ubuntu \
 $(lsb_release -cs) stable" | sudo tee /etc/apt/sources.list.d/docker.list > /dev/null
Step 3: Update the package list again and install Docker Compose.
sudo apt-get update
sudo apt-get install docker-ce docker-ce-cli containerd.io docker-compose-plugin -y
Step 4: Move to your home directory and clone the Dashy project from GitHub.
cd ~
git clone https://github.com/Lissy93/dashy.git
Step 5: Move to your Dashy directory and modify the docker-compose.yml. At this moment, there is a minor bug that Dashy will not rebuild whenever we make a change.
We have to add “entrypoint: [“yarn”,”build-and-start”]” to the docker-compose.yml to make it function properly. The drawback is whenever you click the “save on disk” button, it will build the whole project again. It can be CPU-consuming for some low-end VM. I hope there is a more elegant way to solve this problem.
You may have a look at the issue here.
cd dashy
sudo nano docker-compose.yml
version: "3.8"

services:
 dashy:
  container_name: Dashy
  hostname: dashy
  # Pull latest image from DockerHub
  image: lissy93/dashy:latest

  volumes:
   - ./public:/app/public
   - type: bind
    source: .env
    target: /app/public/.env
  entrypoint: ["yarn","build-and-start"]
  ports:
   - 4000:80

  # Set any environmental variables
  environment:
   - NODE_ENV=production

  # Specify restart policy
  restart: unless-stopped

  # Configure healthchecks
  healthcheck:
   test: ['CMD', 'node', '/app/services/healthcheck']
   interval: 1m30s
   timeout: 10s
   retries: 3
   start_period: 40s

    networks:
      - npm
networks:
  npm:
    name: npm_network
Press Ctrl + X to save the file.
Step 6: Modify .env file.
sudo sed -i 's/# HOST=localhost/HOST=0.0.0.0/' .env
OR
sudo nano .env
# The host that Dashy is running on, domain or IP
HOST=0.0.0.0
Press Ctrl + X to save.
Step 7: Execute the Docker container in the background.
sudo docker compose up -d
Step 8: Click the pencil icon on the top-right corner to enter edit mode.

Step 9: Click the Edit Pages.

Step 10: Add two dummy pages, as shown below. Click Save.

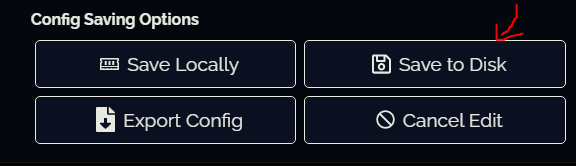
Step 11: Click the Save to Disk in the bottom-right corner.
After some time, press F5 to reload the page, and the “Home” and “Work” pages will be displayed on your Dashy dashboard.

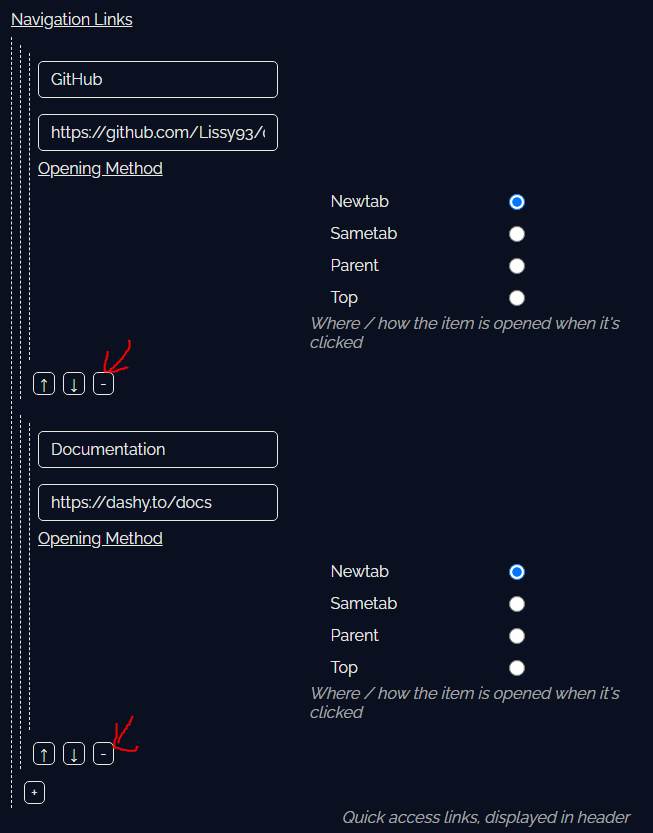
Step 12: Click the pencil icon on the top-right corner to enter edit mode and click the Edit Page Info in the bottom-left corner.

Step 13: Remove the GitHub and Documentation pages by clicking the minus icon.
Press Save to Disk to take effect.
If your Dashy dashboard rebuilds whenever you make a change, congratulations, you have successfully created your personal home page.
The following article will teach you how to add authentication on Dashy using Authelia.
Reverse Proxying your Dashy dashboard under Nginx Proxy Manager and DNS proxying your domain with Cloudflare will also be included.