
To secure our servers, we shall avoid synchronizing the MySQL database over the public network. In this article, I will introduce how to synchronize two MySQL databases with master-master replication inside your Tailscale private network.
Follow Steps 1-5 on this article or instructions on the Tailscale official website to set up Tailscale on your server.
If you are using docker, ensure you have bound the device’s 3306 port to your container’s MySQL port (Port 3306 usually).
Assume I have two servers named server1, and server2 respectively.
Server1 & 2: Ubuntu Server 22.04 LTS
Server1 Tailscale IP: 100.98.50.15
Server2 Tailscale IP: 100.80.250.34
Server1 local IP: 10.10.10.2
Server2 local IP: 10.10.11.2
Step 1: Edit MySQL’s my.cnf configuration file. On server1,
nano /etc/my.cnflog-bin=mysql-bin
server_id=1Step 2: Restart MySQL service
systemctl restart mysqldStep 3: Login to MySQL shell. Replace <username> with your MySQL username.
mysql -h 127.0.0.1 -P 3306 -u <username> -pStep 4: Record Server1’s file set and position
show master status;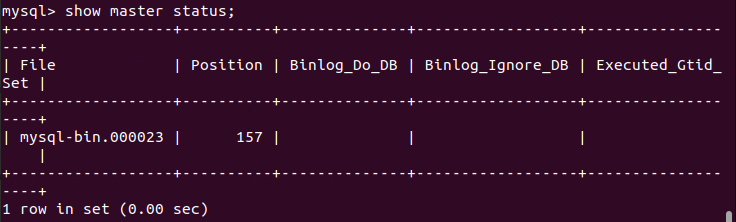
In my case, the server1 file set is “mysql-bin.000023” and the position equals 157.
Step 5: To access from a remote machine, you need to create a new user for replication. Replace <password> with your MySQL password e.g. ‘password’
CREATE USER 'rep'@'%' IDENTIFIED WITH mysql_native_password BY <password>;
GRANT REPLICATION SLAVE ON *.* TO 'rep'@'%';
flush privileges;
Step 6: Edit MySQL’s my.cnf configuration file. On server2,
nano /etc/my.cnflog-bin=mysql-bin
server_id=2If you are using MySQL from a cloned VM, remember to reset your UUID by
rm -rf /var/lib/mysql/auto.cnfStep 7: Restart MySQL service.
systemctl restart mysqldStep 8: Login to MySQL shell. Replace <username> with your MySQL username.
mysql -h 127.0.0.1 -P 3306 -u <username> -pStep 9: Stop the replication threads
stop slave;Step 10: Record Server2’s file set and position
show master status;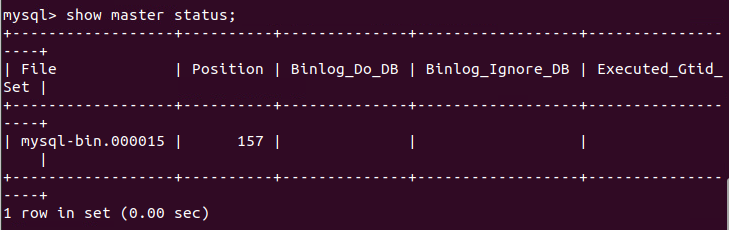
In my case, the server2 file set is “mysql-bin.000015” and the position equals 157.
Step 11: Again, to access from a remote machine, you need to create a new user for replication. Replace <password> with your MySQL password e.g. ‘password’
CREATE USER 'rep'@'%' IDENTIFIED WITH mysql_native_password BY <password>;
GRANT REPLICATION SLAVE ON *.* TO 'rep'@'%';
flush privileges;
Step 12: Replace <ip> with your server1 Tailscale IP, <password> with your password e.g. ‘password’, <file> with previously recorded file set, <position> with previously recorded position
change master_host ip, master_password, master_log_file, master_log_pos
change master to master_host = <ip> ,
master_user = 'rep' , master_password = <password> ,
master_log_file = <file> ,  master_log_pos = <position>;
In my case
change master_host ip, master_password, master_log_file, master_log_pos
change master to master_host = '100.98.50.15' ,
master_user = 'rep' , master_password = 'password' ,
master_log_file = 'mysql-bin.000023' ,  master_log_pos = 157;
Step 13: Start replication threads
start slave;Step 14: Back to server1 and Stop the replication threads
stop slave;Step 15: Replace <ip> with your server2 Tailscale IP, <password> with your password e.g. ‘password’, <file> with previously recorded file set, <position> with previously recorded position
change master_host ip, master_password, master_log_file, master_log_pos
change master to master_host = <ip> ,
master_user = 'rep' , master_password = <password> ,
master_log_file = <file> ,  master_log_pos = <position>;
In my case
change master_host ip, master_password, master_log_file, master_log_pos
change master to master_host = '100.80.250.34' ,
master_user = 'rep' , master_password = 'password' ,
master_log_file = 'mysql-bin.000015' ,  master_log_pos = 157;
Step 16: Start replication threads
start slave;Step 17: Ensure server1 & 2 are set up correctly
show slave status \G;Slave_IO_State: Yes
Slave_IO_Running: YesStep 18: MySQL Master-Master replication should be created properly. To verify,
On Server1,
create database test;On server2, the database ‘test’ should be displayed if the synchronization is successful
show databases;drop database test;On server1, the database ‘test’ should be removed if the synchronization is successful
show databases;You may try to set up a master-slave MySQL replication by yourself.