Headscale is an alternative option to Tailscale. One key advantage is that it is fully open-source software, making it more transparent than Tailscale. Moreover, some application requires low latency, such as forming a Proxmox Cluster; Headscale could be a better option than Tailscale as Tailscale may not have relay servers in some countries. If a direct connection cannot be formed, the latency between servers may increase dramatically, causing Corosync issues. On Headscale, we can build our own relay server in any country. Feel free to leave a comment if you want to clarify something. 🙂
Prerequisite: Create domains for Authelia and Headscale.
In my case, I choose auth.silicon.blog for Authelia and headscale.silicon.blog for Headscale.
Step 1: Install docker on your Ubuntu 22.04.
sudo apt-get update
sudo apt-get install     ca-certificates     curl     gnupg     lsb-release -y
curl -fsSL https://download.docker.com/linux/ubuntu/gpg | sudo gpg --dearmor -o /usr/share/keyrings/docker-archive-keyring.gpg
echo   "deb [arch=$(dpkg --print-architecture) signed-by=/usr/share/keyrings/docker-archive-keyring.gpg] https://download.docker.com/linux/ubuntu \
$(lsb_release -cs) stable" | sudo tee /etc/apt/sources.list.d/docker.list > /dev/null
sudo apt-get update
sudo apt-get install docker-ce docker-ce-cli containerd.io docker-compose-plugin -y
Step 2: Create a folder for Headscale and create a docker-compose.yml.
sudo mkdir headscale
cd headscale
sudo nano docker-compose.yml
version: '3'
services:
  app:
    image: 'jc21/nginx-proxy-manager:2.9.18'
    hostname: npm1
    restart: unless-stopped
    ports:
      #- '80:80'
      #- '81:81'
      - '443:443'
    volumes:
      - ./data:/data
      #- ./letsencrypt:/etc/letsencrypt
      #- ./conf.d:/conf.d
    networks:
      - npm

  headscale:
    image: headscale/headscale:0.21
    #2.0-alpha1
    hostname: headscale
    volumes:
      #create config.yaml first
      - ./config:/etc/headscale/
      - ./data_headscale:/var/lib/headscale
      - ./headscale/run:/var/run/headscale
    #ports:
    #  - 8080:8080
    command: headscale serve
    restart: unless-stopped
    networks:
      - npm

  headscale-ui:
    container_name: headscale-ui
    hostname: headscale-ui
    image: ghcr.io/gurucomputing/headscale-ui:latest
    restart: unless-stopped
    #ports:
    #  - 9443:443
    networks:
      - npm

  authelia:
    image: authelia/authelia
    container_name: authelia
    hostname: authelia
    restart: unless-stopped
    volumes:
      - ./authelia:/config
    #ports:
    #   - 9091:9091
    networks:
      - npm

  redis:
    image: redis:alpine
    container_name: redis
    volumes:
      - ./redis:/data
    #ports:
    #  - 6379:6379
    restart: unless-stopped
    networks:
      - npm

networks:
  npm:
    name: npm_network
Press Ctrl + X to save the file. Do not start the docker-compose command at this moment.
Step 3: Download the configuration file for Headscale.
sudo mkdir config
cd config
sudo wget https://raw.githubusercontent.com/juanfont/headscale/252342a0a5e34ef045d89abb62594905d6994015/config-example.yaml
sudo mv config-example.yaml config.yaml
Step 4: Edit config.yaml.
sudo nano config.yaml
Modify the following line. Replace server_url with your Headscale domain name, listen_addr with 0.0.0.0:8080, ip_prefixes to your desired IP range, base_domain with your domain name and randomize_client_port to true.
server_url: http://127.0.0.1:8080
listen_addr: 127.0.0.1:8080
ip_prefixes:
- fd7a:115c:a1e0::/48
- 100.64.0.0/10
base_domain: example.com
randomize_client_port: false
In my case, I will change the settings to
server_url: https://headscale.silicon.blog
listen_addr: 0.0.0.0:8080
ip_prefixes:
- 10.100.0.0/20
base_domain: silicon.blog
randomize_client_port: true
Back to project directory
cd ..
Press Ctrl + X to save the file.
Step 5: Create a folder and the required files for Authelia.
sudo mkdir authelia
cd authelia
sudo touch db.sqlite3
sudo wget https://raw.githubusercontent.com/authelia/authelia/master/examples/compose/lite/authelia/configuration.yml
Step 6: Modify the configuration.yml for Authelia.
sudo nano configuration.yml

Create 63 random alpha-numeric characters as jwt_secret using this website. Replace the default_redirection_url with your Authelia domain.
In my case, it is https://auth.silicon.blog Remove these two lines on the default the configuration.yml
server:
  address: 'tcp://:9091'
Replace it by
server:
  host: 0.0.0.0
  port: 9091
Replace the totp issuer with your domain. In my case, it is silicon.blog
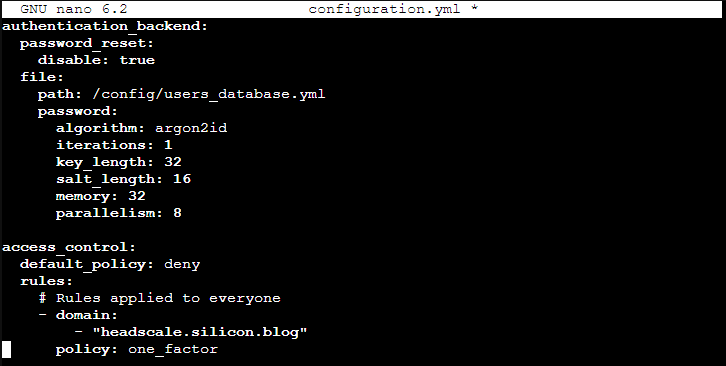
Change authentication_backend and access_control as below. Replace your access_control.rules.domain with your Headscale domain name.
In my case, it is “headscale.silicon.blog”. 2FA will not be enabled in this example, so the policy we use will be one_factor (password only).
authentication_backend:
  password_reset:
    disable: true
  file:
    path: /config/users_database.yml
    password:
      algorithm: argon2id
      iterations: 1
      key_length: 32
      salt_length: 16
      memory: 32
      parallelism: 8

access_control:
  default_policy: deny
  rules:
    # Rules applied to everyone
    - domain:
        - "headscale.silicon.blog"
      policy: one_factor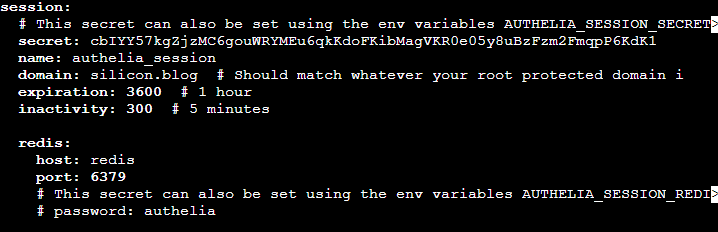
Create 63 random alpha-numeric characters for session secret using this website. Replace the session domain with your domain name.

Create 63 random alpha-numeric characters for the storage encryption key using this website.
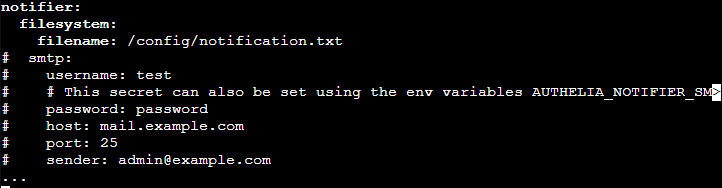
Comment on the SMTP part. You may give it a try, but I have never used it. It may crash your Authelia docker container if you leave it alone with the default value. Press Ctrl + X to save the file.
Step 7: Download the users_database.yml for Authelia.
sudo wget https://raw.githubusercontent.com/authelia/authelia/master/examples/compose/lite/authelia/users_database.yml
Step 8: Create a password for your Authelia user. Replace your_password with your own password.
sudo docker run authelia/authelia:latest authelia hash-password your_password
In my case, it is
sudo docker run authelia/authelia:latest authelia hash-password headscaleTesting
The output will be something like this
Digest: $argon2id$v=19$m=65536,t=3,p=4$zK2D/vslTc6oUkrcQJww4g$pU5Qe5E0Ra6nM8efEO2/trrFqwvm/Afg723CbWLi3kw
Copy the content of $argon… It will be used in the users_database.yml.
Step 9: Edit users_database.yml.
sudo nano users_database.yml
By default, it will look likes this
# List of users
users:
  authelia:
    disabled: false
    displayname: "Authelia User"
    # Password is authelia
    password: "$6$rounds=50000$BpLnfgDsc2WD8F2q$Zis.ixdg9s/UOJYrs56b5QEZFiZECu0qZVNsIYxBaNJ7ucIL.nlxVCT5tqh8KHG8X4tlwCFm5r6NTOZZ5qRFN/"  # yamllint disable-line rule:line-length
    email: [email protected]
    groups:
      - admins
      - dev
Replace authelia: with your username and password with the previous generated password (start with $argon2). In my case, it is
# List of users
users:
  silicon:
    disabled: false
    displayname: "silicon"
    password: "$argon2id$v=19$m=65536,t=3,p=4$zK2D/vslTc6oUkrcQJww4g$pU5Qe5E0Ra6nM8efEO2/trrFqwvm/Afg723CbWLi3kw"
    email: [email protected]
    groups:
      - admins
      - dev
Press Ctrl + X to save the file.
Step 10: Back to the project directory and start the containers.
cd ..
sudo docker compose up -d
Check your container status by
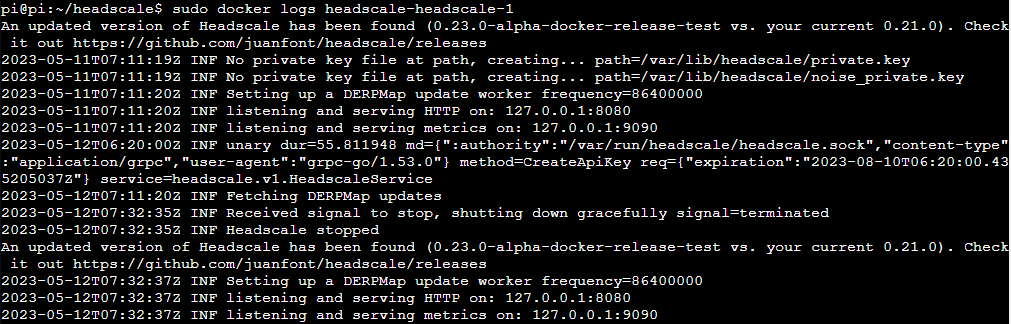
sudo docker psCheck the logs of your Headscale container with the following command. Replace headscale_container with your Headscale container.
sudo docker logs headscale_container
In my case, it is
sudo docker logs headscale_headscale_1
Step 11: Log in to the Nginx Proxy Manager’s Admin interface. Replace your_ip with your IP. http://your_ip:81/
The default user and password are:
Email:    [email protected]
Password: changeme
Step 12: Combine Nginx Proxy Manager with Cloudflare using my previous article.
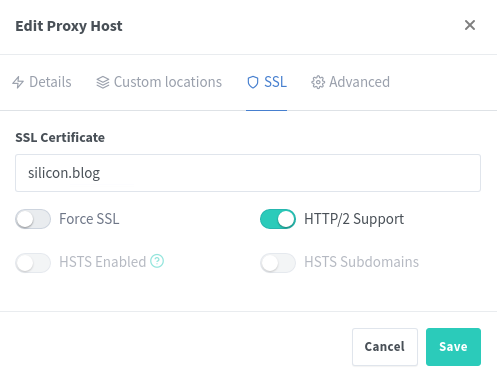
Step 13: Create a Proxy Host for your Authelia domain.
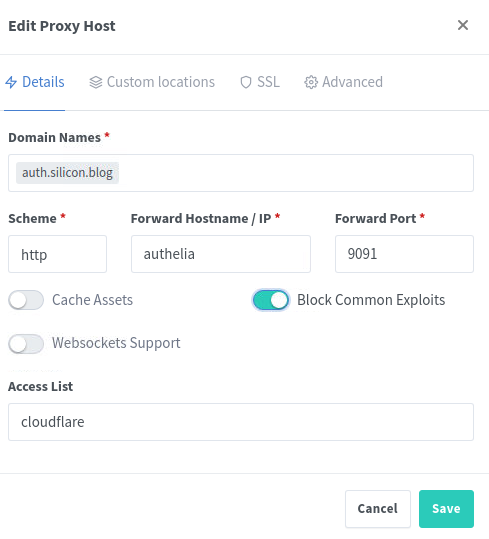
Replace the domain name with your Authelia domain name. If you follow Step 12 to create an access list, the option ‘cloudflare’ will be displayed on the Access List.
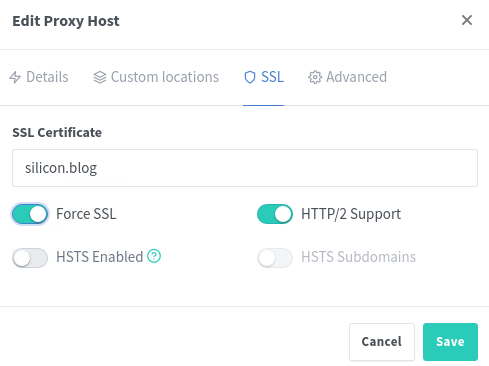
If you follow Step 12 to import an SSL certificate, an option with your domain will be displayed on the SSL Certificate. Remember to enable HTTP/2 Support.
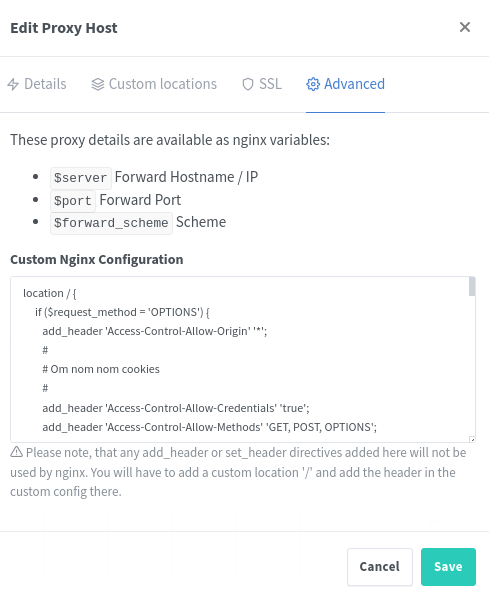
Add the following script to the Advanced part.
location / {
     if ($request_method = 'OPTIONS') {
        add_header 'Access-Control-Allow-Origin' '*';
        add_header 'Access-Control-Allow-Credentials' 'true';
        add_header 'Access-Control-Allow-Methods' 'GET, POST, OPTIONS';
        add_header 'Access-Control-Allow-Headers' 'DNT,X-CustomHeader,Keep-Alive,User-Agent,X-Requested-With,If-Modified-Since,Cache-Control,Content-Type';
        add_header 'Access-Control-Max-Age' 1728000;
        add_header 'Content-Type' 'text/plain charset=UTF-8';
        add_header 'Content-Length' 0;
        return 204;
     }
     if ($request_method = 'POST') {
        add_header 'Access-Control-Allow-Origin' '*';
        add_header 'Access-Control-Allow-Credentials' 'true';
        add_header 'Access-Control-Allow-Methods' 'GET, POST, OPTIONS';
        add_header 'Access-Control-Allow-Headers' 'DNT,X-CustomHeader,Keep-Alive,User-Agent,X-Requested-With,If-Modified-Since,Cache-Control,Content-Type';
     }
     if ($request_method = 'GET') {
        add_header 'Access-Control-Allow-Origin' '*';
        add_header 'Access-Control-Allow-Credentials' 'true';
        add_header 'Access-Control-Allow-Methods' 'GET, POST, OPTIONS';
        add_header 'Access-Control-Allow-Headers' 'DNT,X-CustomHeader,Keep-Alive,User-Agent,X-Requested-With,If-Modified-Since,Cache-Control,Content-Type';
     }

    set $upstream_authelia http://authelia:9091;
    proxy_pass $upstream_authelia;
    client_body_buffer_size 128k;

    #Timeout if the real server is dead
    proxy_next_upstream error timeout invalid_header http_500 http_502 http_503;

    # Advanced Proxy Config
    send_timeout 5m;
    proxy_read_timeout 360;
    proxy_send_timeout 360;
    proxy_connect_timeout 360;

    # Basic Proxy Config
    proxy_set_header Host $http_host;
    proxy_set_header X-Real-IP $remote_addr;
    proxy_set_header X-Forwarded-For $proxy_add_x_forwarded_for;
    proxy_set_header X-Forwarded-Proto $scheme;
    proxy_set_header X-Forwarded-Host $host;
    proxy_set_header X-Forwarded-Uri $request_uri;
    proxy_set_header X-Forwarded-Ssl on;
    proxy_redirect  http://  $scheme://;
    proxy_http_version 1.1;
    proxy_set_header Connection "";
    proxy_cache_bypass $cookie_session;
    proxy_no_cache $cookie_session;
    proxy_buffers 64 256k;

    set_real_ip_from 172.17.0.0/16;

    real_ip_header X-Forwarded-For;
    real_ip_recursive on;
}
Press Save to create a reverse proxy record.
Step 14: Create a Proxy Host for your Headscale domain. Remember to enable WebSockets Support.
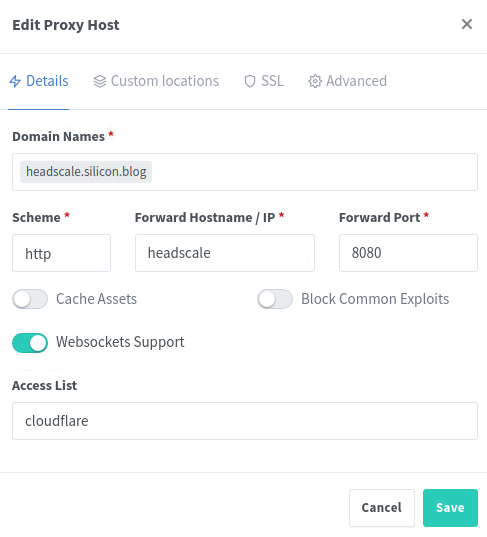
Replace the domain name with your Headscale domain name. If you follow Step 12 to create an access list, the option ‘cloudflare’ will be displayed on the Access List.
If you follow Step 12 to import an SSL certificate, an option with your domain will be displayed on the SSL Certificate. Remember to enable HTTP/2 Support.
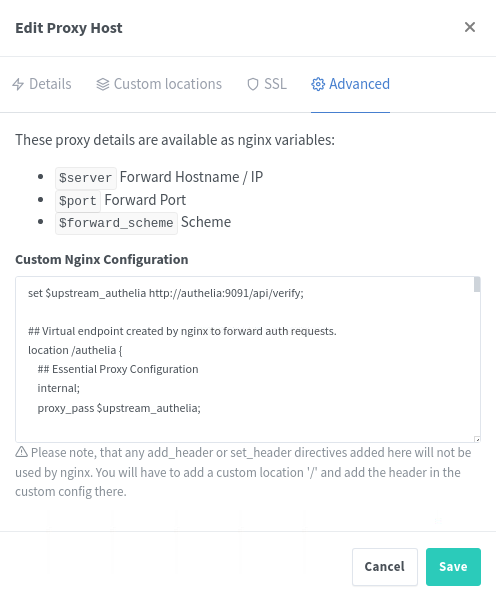
Add the following script to the Advanced part. Search for https://auth.silicon.blog and replace it with your Authelia domain.
set $upstream_authelia http://authelia:9091/api/verify;

## Virtual endpoint created by nginx to forward auth requests.
location /authelia {
    ## Essential Proxy Configuration
    internal;
    proxy_pass $upstream_authelia;

    ## Headers
    ## The headers starting with X-* are required.
    proxy_set_header X-Original-URL $scheme://$http_host$request_uri;
    proxy_set_header X-Original-Method $request_method;
    proxy_set_header X-Forwarded-Method $request_method;
    proxy_set_header X-Forwarded-Proto $scheme;
    proxy_set_header X-Forwarded-Host $http_host;
    proxy_set_header X-Forwarded-Uri $request_uri;
    proxy_set_header X-Forwarded-For $remote_addr;
    proxy_set_header Content-Length "";
    proxy_set_header Connection "";

    ## Basic Proxy Configuration
    proxy_pass_request_body off;
    proxy_next_upstream error timeout invalid_header http_500 http_502 http_503; # Timeout if the real server is dead
    proxy_redirect http:// $scheme://;
    proxy_http_version 1.1;
    proxy_cache_bypass $cookie_session;
    proxy_no_cache $cookie_session;
    proxy_buffers 4 32k;
    client_body_buffer_size 128k;

    ## Advanced Proxy Configuration
    send_timeout 5m;
    proxy_read_timeout 240;
    proxy_send_timeout 240;
    proxy_connect_timeout 240;

set_real_ip_from 172.17.0.0/16;
real_ip_header X-Forwarded-For;
}

location /web {
    ## Headers
    proxy_set_header Host $host;
    proxy_set_header X-Original-URL $scheme://$http_host$request_uri;
    proxy_set_header X-Forwarded-Proto $scheme;
    proxy_set_header X-Forwarded-Host $http_host;
    proxy_set_header X-Forwarded-Uri $request_uri;
    proxy_set_header X-Forwarded-Ssl on;
    proxy_set_header X-Forwarded-For $remote_addr;
    ## Send a subrequest to Authelia to verify if the user is authenticated and has permission to access the resource.
    auth_request /authelia;

    ## Set the $target_url variable based on the original request.

    ## Comment this line if you're using nginx without the http_set_misc module.
    set_escape_uri $target_url $scheme://$http_host$request_uri;

    ## Uncomment this line if you're using NGINX without the http_set_misc module.
    # set $target_url $scheme://$http_host$request_uri;

    ## Save the upstream response headers from Authelia to variables.
    auth_request_set $user $upstream_http_remote_user;
    auth_request_set $groups $upstream_http_remote_groups;
    auth_request_set $name $upstream_http_remote_name;
    auth_request_set $email $upstream_http_remote_email;

    ## Inject the response headers from the variables into the request made to the backend.
    proxy_set_header Remote-User $user;
    proxy_set_header Remote-Groups $groups;
    proxy_set_header Remote-Name $name;
    proxy_set_header Remote-Email $email;

    ## If the subreqest returns 200 pass to the backend, if the subrequest returns 401 redirect to the portal.
    error_page 401 =302 https://auth.silicon.blog/?rd=$target_url;

    proxy_pass https://headscale-ui:443;
    set_real_ip_from 172.17.0.0/16;
    real_ip_header X-Forwarded-For;
    }
Step 15: Remember to port forward your port 443 from your router.
Congratulation! You have already set up Headscale. In the following article, you will learn how to connect your device to the Headscale server and use the Headscale web UI to add users.
Does anyone have this working ? been struggling with it for 24 hours
This is outdated.
For the Headscale:
one need to change ‘headscale serve’ to ‘serve’ on launch command.
Authelia won’t start with this set up as well:
‘jwt_secret’ is deprecated,
configuration keys ‘server.host’, ‘server.port’, and ‘server.path’ are deprecated
Configuration: session: option ‘cookies’ must be configured with the per cookie option
domain config #1 (domain ‘my.domain’): option ‘authelia_url’ does not share a cookie scope with domain
Yup, sorry this article is dated and I don’t have time to update it to the latest version.
You may need to check out the doc for how to use the latest version of Authelia and Headscale.