You learned how to combine Nginx Proxy Manager with Cloudflare in the previous article. Moreover, You have added the SSL Certificate of your domain to your Nginx Proxy Manager. This tutorial will teach you how to self-host a WordPress website using docker and to reverse proxy your WordPress container using Nginx Proxy Manager.
Step 1: Update your docker-compose.yml.
sudo nano docker-compose.yml
version: '3'
services:
  app:
    image: 'jc21/nginx-proxy-manager:2.9.18'
    hostname: npm
    container_name: npm
    restart: unless-stopped
    ports:
      - '81:81'
      - '443:443'
    volumes:
      - ./data:/data
  - ./letsencrypt:/etc/letsencrypt
    networks:
      - npm


  mysql:
    image: mysql:8.0
    hostname: mysql
    container_name: mysql
    env_file: .env
    environment:
      MYSQL_ROOT_PASSWORD: ${MYSQL_ROOT_PASSWORD}
      MYSQL_DATABASE: ${MYSQL_DATABASE}
      MYSQL_USER: ${MYSQL_USER}
      MYSQL_PASSWORD: ${MYSQL_PASSWORD}
    volumes:
       - mysql:/var/lib/mysql
    networks:
      - npm


  wordpress:
    image: wordpress:6.2-php8.0-apache
    hostname: wordpress-1
    container_name: wordpress-1
    ports:
      - 8080:80
    environment:
      WORDPRESS_DB_HOST: mysql
      WORDPRESS_DB_USER: ${MYSQL_USER}
      WORDPRESS_DB_PASSWORD: ${MYSQL_PASSWORD}
      WORDPRESS_DB_NAME: ${MYSQL_DATABASE}
    networks:
      - npm


volumes:
  mysql:


networks:
  npm:
    name: npm_network
Press Ctrl + X to save the file.
Step 2: Create a .env file to store local environment variables.
sudo nano .env
MYSQL_ROOT_PASSWORD="your_mysql_root_password"
MYSQL_USER="your_mysql_user"
MYSQL_PASSWORD="your_mysql_user_password"
MYSQL_DATABASE="your_wordpress_db1"
Press Ctrl + X to save the file.
Step 3: Install WordPress on your device. Replace your_device_ip with your device IP.
http://your_device_ip:8080/wp-admin/install.php
In my case, it is
http://192.168.1.128:8080/wp-admin/install.phpStep 4: After installation, log in with the admin account.
Go to Settings and change the WordPress Address (URL) and Site Address (URL) to your WordPress domain name.
Remember to use HTTPS in the beginning. In my case, it is https://test.silicon.blog.

You will be disconnected from the site. Everything is fine.
Your WordPress site will be up again once you configure the Nginx Proxy Manager to reverse proxy your WordPress domain.
Step 5: Log in to your Nginx Proxy Manager dashboard (http://your_npm_ip:81).
Step 6: Create a Proxy Host. If you use the docker-compose.yml file above, the setting will look like the following picture, but the domain name will be your WordPress domain.
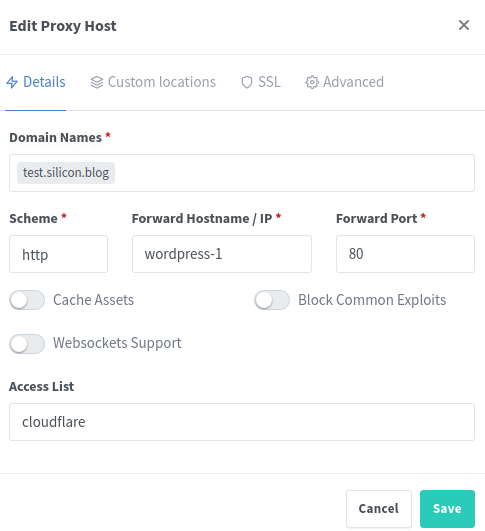
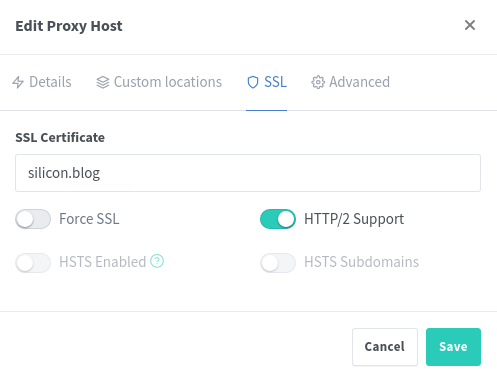
Remember to add SSL Certificate. HTTP/2 Support is optional.
Step 7: If your device is behind a router, remember to port forward the 443 port from the WAN to your device.
![]()
Enter your WordPress domain name on your browser. If you could access it, congratulation, you are now able to build a blog and share your content with the general public with your self-hosted WordPress.
However, you have to expose your 443 port to the public internet, which may become a security risk. Botnets on the public internet may scan random IPs with a port scanner. Eventually, they may discover your server and try to attack it.
The following article will teach you how to hide your 443 port meanwhile combining Cloudflare with your Nginx Proxy Manager.
Thank you a lot for these instructions!
I asked my colleague, who is a DevOps engineer, to follow it.
He has done it!
Now I have WordPress CMS on my own home server!
Dear wimax85,
You’re welcome! If you have any more questions or need further assistance with your WordPress site, feel free to ask. 🙂
Enjoy your new home server setup!