You learned how to create a WordPress docker container in the previous article. However, the SSL module of Apache is disabled by default. It implies you can only transfer and handle requests using HTTP (without SSL encryption).
This article will guide you through the steps to enable HTTPS on your WordPress Docker container using Cloudflare Origin or the Let’s Encrypt certificate.
Step 1: Copy the docker-entrypoint.sh to your project directory. Replace wordpress-1 with the name of your docker WordPress container.
sudo docker cp wordpress-1:/usr/local/bin/docker-entrypoint.sh docker-entrypoint.sh
Step 2: Enable the SSL module at the end of docker-entrypoint.sh.
sudo nano docker-entrypoint.sh
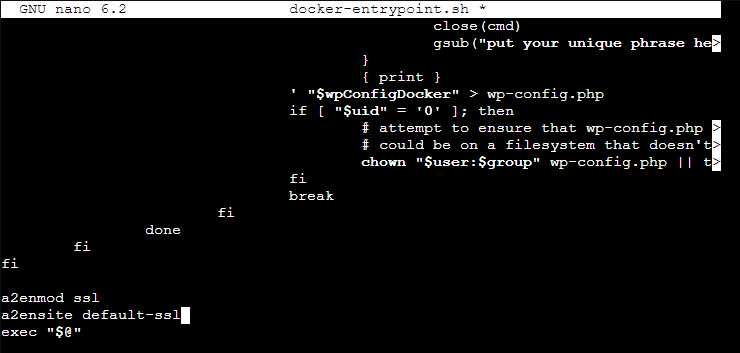
a2enmod ssl
a2ensite default-ssl
Ctrl + X to save the file.
Step 3: Create an Origin Certificate of your domain on Cloudflare. Unlike importing the private key to Nginx Proxy Manager, this time, you don’t need to modify the private key mentioned in the previous article.
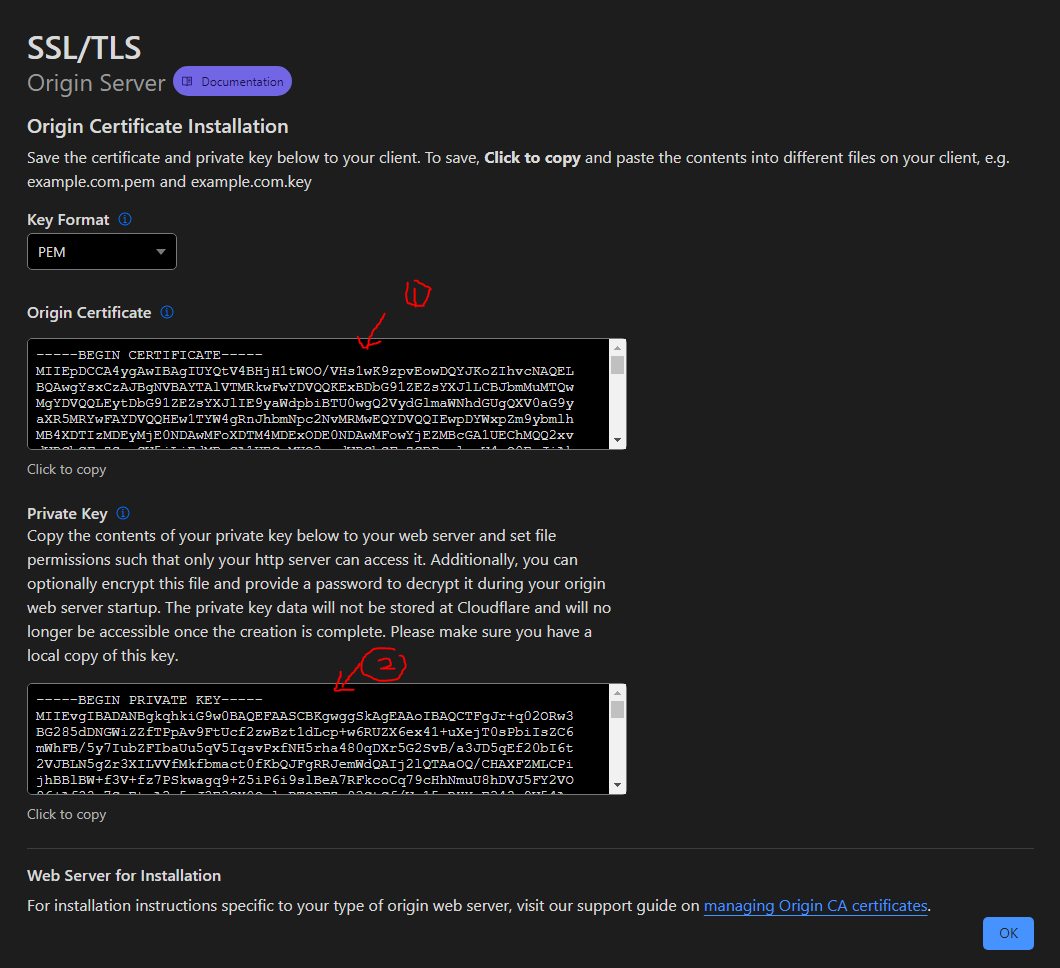
sudo mkdir certs
sudo nano certs/test.silicon.blog.pem
—–BEGIN CERTIFICATE—–
….
—–END CERTIFICATE—–
Ctrl + X to save the file.
sudo nano certs/test.silicon.blog.key
—–BEGIN PRIVATE KEY—–
….
—–END PRIVATE KEY—–
Ctrl + X to save the file.
Step 4: Modify the default-ssl.conf such that your local Apache server will handle HTTPS requests. Replace your your_domain_name with your domain name.
sudo nano default-ssl.conf
<IfModule mod_ssl.c>
        <VirtualHost *:443>
                ServerName your_domain_name

                DocumentRoot /var/www/html

                ErrorLog ${APACHE_LOG_DIR}/error.log
                CustomLog ${APACHE_LOG_DIR}/access.log combined

                SSLEngine on
                SSLCertificateFile    /etc/ssl/certs/your_domain_name.pem
                SSLCertificateKeyFile /etc/ssl/certs/your_domain_name.key

                <FilesMatch "\.(cgi|shtml|phtml|php)$">
                                SSLOptions +StdEnvVars
                </FilesMatch>
                <Directory /usr/lib/cgi-bin>
                                SSLOptions +StdEnvVars
                </Directory>
        </VirtualHost>
</IfModule>
In my case, it is
<IfModule mod_ssl.c>
	<VirtualHost *:443>
			ServerName test.silicon.blog

			DocumentRoot /var/www/html

			ErrorLog ${APACHE_LOG_DIR}/error.log
			CustomLog ${APACHE_LOG_DIR}/access.log combined

			SSLEngine on
			SSLCertificateFile    /etc/ssl/certs/test.silicon.blog.pem
			SSLCertificateKeyFile /etc/ssl/certs/test.silicon.blog.key

			<FilesMatch "\.(cgi|shtml|phtml|php)$">
							SSLOptions +StdEnvVars
			</FilesMatch>
			<Directory /usr/lib/cgi-bin>
							SSLOptions +StdEnvVars
			</Directory>
	</VirtualHost>
</IfModule>
Ctrl + X to save the file.
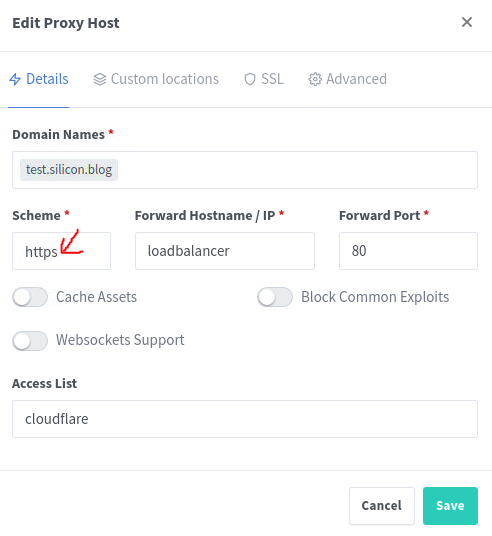
Step 5: Log in to your Nginx Proxy Manager dashboard, and change the Scheme from HTTP to HTTPS.
Step 6: Change port 80 (HTTP) of your WordPress to port 443 (HTTPS)
sudo docker compose up -d
=========================== Load Balancer =============================
version: '3'
services:
  app:
    image: 'jc21/nginx-proxy-manager:2.9.18'
    hostname: npm
    container_name: npm
    restart: unless-stopped
    ports:
      - '81:81'
      - '443:443'
    volumes:
      - ./templates:/app/templates
      - ./conf.d:/etc/nginx/conf.d
      - ./data:/data
      - ./letsencrypt:/etc/letsencrypt #optional
    networks:
      - npm

  mysql:
    image: mysql:8.0
    hostname: mysql
    container_name: mysql
    env_file: .env
    environment:
      MYSQL_ROOT_PASSWORD: ${MYSQL_ROOT_PASSWORD}
      MYSQL_DATABASE: ${MYSQL_DATABASE}
      MYSQL_USER: ${MYSQL_USER}
      MYSQL_PASSWORD: ${MYSQL_PASSWORD}
    volumes:
       - mysql:/var/lib/mysql
    networks:
      - npm

  wordpress:
    image: wordpress:6.2-php8.0-apache
    hostname: wordpress-1
    container_name: wordpress-1
    ports:
      - 8080:443
    volumes:
      - ./docker-entrypoint.sh:/usr/local/bin/docker-entrypoint.sh
      - ./certs:/etc/ssl/certs
      - ./default-ssl.conf:/etc/apache2/sites-available/default-ssl.conf
    environment:
      WORDPRESS_DB_HOST: mysql
      WORDPRESS_DB_USER: ${MYSQL_USER}
      WORDPRESS_DB_PASSWORD: ${MYSQL_PASSWORD}
      WORDPRESS_DB_NAME: ${MYSQL_DATABASE}
    networks:
      - npm

  mysql2:
    image: mysql:8.0
    hostname: mysql2
    container_name: mysql2
    env_file: .env
    environment:
      MYSQL_ROOT_PASSWORD: ${MYSQL_ROOT_PASSWORD}
      MYSQL_DATABASE: ${MYSQL_DATABASE2}
      MYSQL_USER: ${MYSQL_USER2}
      MYSQL_PASSWORD: ${MYSQL_PASSWORD2}
    volumes:
       - mysql2:/var/lib/mysql
    networks:
      - npm

  wordpress2:
    image: wordpress:6.2-php8.0-apache
    hostname: wordpress-2
    container_name: wordpress-2
    ports:
      - 8081:443
    volumes:
      - ./docker-entrypoint.sh:/usr/local/bin/docker-entrypoint.sh
      - ./certs:/etc/ssl/certs
      - ./default-ssl.conf:/etc/apache2/sites-available/default-ssl.conf
    environment:
      WORDPRESS_DB_HOST: mysql2
      WORDPRESS_DB_USER: ${MYSQL_USER2}
      WORDPRESS_DB_PASSWORD: ${MYSQL_PASSWORD2}
      WORDPRESS_DB_NAME: ${MYSQL_DATABASE2}
    networks:
      - npm

  mysql3:
    image: mysql:8.0
    hostname: mysql3
    container_name: mysql3
    env_file: .env
    environment:
      MYSQL_ROOT_PASSWORD: ${MYSQL_ROOT_PASSWORD}
      MYSQL_DATABASE: ${MYSQL_DATABASE3}
      MYSQL_USER: ${MYSQL_USER3}
      MYSQL_PASSWORD: ${MYSQL_PASSWORD3}
    volumes:
       - mysql3:/var/lib/mysql
    networks:
      - npm

  wordpress3:
    image: wordpress:6.2-php8.0-apache
    hostname: wordpress-3
    container_name: wordpress-3
    ports:
      - 8082:443
    volumes:
      - ./docker-entrypoint.sh:/usr/local/bin/docker-entrypoint.sh
      - ./certs:/etc/ssl/certs
      - ./default-ssl.conf:/etc/apache2/sites-available/default-ssl.conf
    environment:
      WORDPRESS_DB_HOST: mysql3
      WORDPRESS_DB_USER: ${MYSQL_USER3}
      WORDPRESS_DB_PASSWORD: ${MYSQL_PASSWORD3}
      WORDPRESS_DB_NAME: ${MYSQL_DATABASE3}
    networks:
      - npm

  tunnel:
    image: cloudflare/cloudflared
    hostname: cloudflared
    container_name: cloudflared
    restart: unless-stopped
    command: tunnel run
    environment:
      TUNNEL_TOKEN: ${CLOUDFLARE_TOKEN}
    networks:
      - npm

volumes:
  mysql:
  mysql2:
  mysql3:

networks:
  npm:
    name: npm_network
====================================== Failover ===================================
version: '3'
services:
  app:
    image: 'jc21/nginx-proxy-manager:2.9.18'
    hostname: npm
    container_name: npm
    restart: unless-stopped
    ports:
      - '81:81'
      - '443:443'
    volumes:
      - ./templates:/app/templates
      - ./conf.d:/etc/nginx/conf.d
      - ./data:/data
      - ./letsencrypt:/etc/letsencrypt #optional
    networks:
      - npm

  mysql:
    image: mysql:8.0
    hostname: mysql
    container_name: mysql
    env_file: .env
    environment:
      MYSQL_ROOT_PASSWORD: ${MYSQL_ROOT_PASSWORD}
      MYSQL_DATABASE: ${MYSQL_DATABASE}
      MYSQL_USER: ${MYSQL_USER}
      MYSQL_PASSWORD: ${MYSQL_PASSWORD}
    volumes:
       - mysql:/var/lib/mysql
    networks:
      - npm

  wordpress:
    image: wordpress:6.2-php8.0-apache
    hostname: wordpress-1
    container_name: wordpress-1
    ports:
      - 8080:443
    volumes:
      - ./docker-entrypoint.sh:/usr/local/bin/docker-entrypoint.sh
      - ./certs:/etc/ssl/certs
      - ./default-ssl.conf:/etc/apache2/sites-available/default-ssl.conf
    environment:
      WORDPRESS_DB_HOST: mysql
      WORDPRESS_DB_USER: ${MYSQL_USER}
      WORDPRESS_DB_PASSWORD: ${MYSQL_PASSWORD}
      WORDPRESS_DB_NAME: ${MYSQL_DATABASE}
    networks:
      - npm

  tunnel:
    image: cloudflare/cloudflared
    hostname: cloudflared
    container_name: cloudflared
    restart: unless-stopped
    command: tunnel run
    environment:
      TUNNEL_TOKEN: ${CLOUDFLARE_TOKEN}
    networks:
      - npm

volumes:
  mysql:

networks:
  npm:
    name: npm_network
Step 7: Modify your proxy host load balancer configuration. Check out this article (Starting from Step 8) if you have yet to learn what it is. Replace X with your proxy host number.
sudo nano ./data/nginx/custom/load_balancerX.confIn my case, for failover configuration
sudo nano ./data/nginx/custom/load_balancer3.confserver wordpress-1:443 weight=1;
server your_failover_server:443 backup;

In my case, for load balance configuration

server wordpress-1:443 weight=1;
server wordpress-2:443 weight=1;
server wordpress-3:443 weight=1;
Step 8: Restart Nginx Proxy Manager by
sudo docker restart npm
If you can connect to your site after restarting your Nginx Proxy Manager, congratulation, your local Apache servers can now handle HTTPS requests, and the data will pass.
Check out this article if you want to use the Let’s Encrypt certificate instead of the Cloudflare Origin certificate.
Some may argue that using HTTPS on a local machine will lower the number of requests we can handle. Why don’t you use HTTPS for failover server WordPress and HTTP for local WordPress servers?
To achieve that, you may manually modify your Nginx Proxy Manager, but I am okay with the current configuration. XD